Deb Ward, GWS, OWS, PWS, WSI - WATERCOLOR/WATER MEDIA - My passion is teaching adult “beginners”. Weekly classes in my home; workshops; classes for Cincinnati Recreation Commission. My work is nationally recognized and published - see “Featured” on my sidebar. I’m a Signature Member of Georgia, Ohio, Pennsylvania and Indiana state Watercolor Societies, Cincinnati Art Club, past-President of Greater Cincinnati Watercolor Society. Contact info below under “Class Information”

Showing posts with label painting instruction. Show all posts

Friday, May 22, 2015

GLASS REFLECTIONS - FINAL

Here is a photo of the students (one lady had to leave early) holding their paintings.  Some are more completed than others.

Several emailed me photos of their finished paintings - and all said they had a great time!


Wednesday, May 20, 2015

GLASS REFLECTIONS - 1

My Glass Reflections workshop was the weekend of April 25-26 and I'm just now getting around to posting about it!  Oh well, better late than never!

 I brought a couple of other similar paintings for reference, which you can see in the photo below.

Looks like everyone is working hard here . . . 

. . . but not here!!!
  Most everyone knew each other, so we had a really fun group.
 These photos were taken as we were breaking for lunch so people were scattered about.
It was a small group - which allows for even more individual instruction.

Tuesday, March 24, 2015

POURING WORKSHOP - COLERAIN ARTISTS

Recently I was asked to give a pouring workshop to a local group of artists who work in all different media - the Colerain Artists in Cincinnati.

This was one day from 10 - 4.  Unfortunately, we were asked to leave a bit earlier so we didn't get them all finished.  And, of course, even though my intention was to get some WIP photos taken, that was not the case - will I ever learn???

So - here are a couple of nice overview photos of the space we used.  It was nice and evenly bright, the tables were large and round so 2 to a table worked perfectly with all of our paraphernalia for pouring.

Lots of laughter, lots of groans, lots of chatting - hmmm - could that be why we didn't all finish our paintings?

Last but not least, here are the painting I used as my example - on the top - and the painting I completed the next day at home.  I had most of it finished, except for another pour.  Then I gave it another good pour once all the miskit was on.
This was my example piece, painted a few years ago.

This was the piece I worked on at the workshop and then finished at home.
Which of these paintings to you prefer?  Identical picture, watercolor poured, but both quite different!

Thursday, March 19, 2015

GOOSE CARD

My daughter texted me to ask if I could produce a thank you card with a goose for her husband.  He wanted to send it to the folks on whose land he had been hunting.  I asked if a Canadian goose would work and he said yes.
My quick background painted - with my NEW QoR watercolor set from Golden.
Even though we get a lot of geese on the lake, I have no photos of them, so I went online to get some reference photos.  I decided the ones of the geese in flight were more interesting, so I drew out my goose on regular paper, enlarged it, then transferred it to a ¼ sheet of watercolor paper and did a loose, washy background.  I put a bit more detail into the goose itself, but not as much as I normally would.
Quick painting, almost done.
When the painting was complete, I took a photo and uploaded it to my software program, then cropped it and put it into my note card template.
Added a bit more feathers and a bit of gray-ish to the white on his head.
Here is the finished painting.
Anything for my Favorite Son-in-Law!
Canadian Goose in Flight, watercolor, ¼ sheet Arches watercolor paper

Thursday, March 12, 2015

PAINTING GLASS REFLECTIONS - WORKSHOP


WORKSHOP
PAINTING GLASS REFLECTIONS
April 25 - 26, 2015

LOCATION 
Cincinnati Art Club Building
1021 Parkside Place
Cincinnati, Ohio  (Mt. Adams)
$125.00

In this workshop you will learn how to paint a reflective glass surface and vibrant stripes.

Day 1 - Using the drawing provided, you will follow along with me as we begin our painting adventure!  
I will be doing demos throughout the day, and you will receive individual attention as needed.
(Painting size - 1/2 sheet of watercolor paper)

Day 2 - We will finalize this painting.  If time permits, using your own photo or drawing, you will incorporate the techniques learned in Day 1 to begin creating your own painting with my help and supervision.

This workshop is for beginners to advanced artists.
For you "doubting Thomases" out there who think you "can't do it"?  
Think again!  You CAN create this lovely painting!

My workshops are "user friendly" - with no stress and tons of fun!
(Not only that, I'll even provide morning and afternoon snacks.)

Interested?  (You know you are!)  
Contact me for more information - dwardart@yahoo.com

Monday, March 9, 2015

CENTRAL TIME - FINAL

The final painting.

I had to repaint between the girders after removing the tape since too much of the paint flowed underneath.  It may have been a "happy accident" since I like the look of this better.

Central Time, Chroma Flow Acrylics on Arches watercolor paper

Thursday, March 5, 2015

Monday, March 2, 2015

BOOKS AND MAGAZINES - OH MY!

My painting “Poured Yupo Peony” is included in the book AcrylicWorks 2: Radical Breakthroughs.  They even used it in an email promo, which I thought was really cool and unexpected.  My California friend, Chris Beck, sent me an email saying she had seen it online, so I double checked my emails on my computer (not my phone where those little tiny photos require magnifying glasses!).

The painting was created by pouring and dripping fluid acrylics on Yupo using taping to separate the layers. I used blue painter's tape so it wouldn't stick to the acrylics when I pulled it off, and so that some of the colors would run underneath to create the fluted edges of some of the petals.  Definitely not my usual support, nor technique, but that's what this painting was all about - getting out of the norm and trying something new.

In addition, another of my paintings is a Finalist in The Artist’s Magazine Over 60 Competition, with my name listed in the March magazine, but no photo.  It's one you have seen here on the blog multiple times.

Thursday, February 26, 2015

Monday, February 23, 2015

CENTRAL TIME - 5

I began sharpening the girders and the clock features.

Wednesday, February 18, 2015

CENTRAL TIME - 4

Now I used clear tape over the shapes between the girders, then applied more color in a “bullseye” around the clock.

Friday, February 13, 2015

CENTRAL TIME - 3

I wet the paper and placed a wash of blues around the clock, blotting the face when the paint ran in.

Monday, February 9, 2015

CENTRAL TIME - 2

 I enlarged the photo and then used a rolling ruler and two straight edges to sharpen up all of those lines!
Finally I had the drawing ready.  It sat on my easel for at least a day so I could study it as I walked by, to make sure it made sense.

Thursday, February 5, 2015

CENTRAL TIME

A few years ago I took a trip to Chicago with a friend.  We spent the weekend with her wild and crazy cousin and had a blast!

I was like a country mouse in the city. 

We took the El train into downtown – a totally new experience for me.  I was confused by the train – not realizing I could simply open the door between cars even though it said “Do not Open While Train is in Motion” – or something like that.  So, when the other two went through the door and it closed on me I was in shock and yelled for my friend.  Of course, that alerted passengers in that car that something was going on and pretty much anyone within earshot – about half the car – looked up at me.  The other two found this incredibly funny and they doubled over in laughter.  I was embarrassed at that point, but later in the day I just laughed at that, along with all of the other stupid things we did.

We acted like little kids all day.

We rode in a taxi – again, not something I’m used to.  All 3 of us crammed into the backseat, sitting on each others laps and hugging to make room!

We took funny photos of ourselves under and around “The Bean” at Millennium Park.

We made goofy poses in front of the lions at the Art Museum.

I recall some skipping and possibly singing, too!

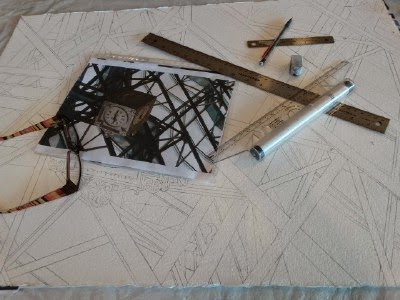
Remember those folks who were alerted on the train when the door closed on me?  Well, when we got to the train station I looked up and saw this cool clock, and all the girders, and thought “now that would make a painting some day.”  So there I stood, photographing what, to a NORMAL person, would be the rafters. 

Two women from the train walked past me, and as they did so, one said to the other "Look, there's that odd woman from the train.  Look, she's taking pictures of the roof."  


And that’s how this painting began!


Monday, January 26, 2015

PEEKABOO BEAR - FINAL

Here is the completed (I think!) painting of "Peekaboo Bear".

"Peekaboo Bear", Chroma Flow Acrylic on Twinrocker paper, full sheet.

Twinrocker is a hand made paper and is slightly smaller than regular paper.

Thursday, January 22, 2015

PEEKABOO BEAR - 4 (Chroma Flow Acrylics)

Step 8 - Here I have added a bit more to the yellow bear.

 Step 9 - Some shadowing begun on the blue bear.
 Step 10 - Blue bear darkened, eyes and nose added to yellow bear.

Thursday, January 15, 2015

PEEKABOO BEAR - 3 (Chroma Flow Acrylics)

Step 5 - More color added to the red bear and the rug.

Step 6 - Now working on the light brown bear.

Step 7 - Here I've added the little brown bear and worked more on the other two bears.
This is really a fun painting - same techniques I usually use, just a very different subject!

Monday, January 5, 2015

PEEKABOO BEAR - 2 (Chroma Flow Acrylics)

Step 3 - Adding color around the bears (a little bit of negative painting) 

Step 4 - Adding more color to the background and rug.  Then I began painting the "peekaboo" bear!

Monday, December 29, 2014

PEEKABOO BEAR - 1 (Chroma Flow Acrylics)

Last fall when I went to the local antique fair one of the photos I took was a grouping of old teddy bears.

I decided this would make a fun painting and, since I needed to do some more work in acrylics for the Chroma paint trial, I decided to use the flow acrylics for this painting.

First step, as always, get that drawing onto the w/c paper.

Step 2 - wet the paper and add paint, allowing it to spread and flow.

Monday, December 8, 2014

TUBA - FINAL

After all of the words and notes were complete I darkened the shadows and made a few more adjustments.

I think it's done now!

Flight of the Bumblebee, 30x22, watercolor and acrylic, Arches 300#