Deb Ward, GWS, OWS, PWS, WSI - WATERCOLOR/WATER MEDIA - My passion is teaching adult “beginners”. Weekly classes in my home; workshops; classes for Cincinnati Recreation Commission. My work is nationally recognized and published - see “Featured” on my sidebar. I’m a Signature Member of Georgia, Ohio, Pennsylvania and Indiana state Watercolor Societies, Cincinnati Art Club, past-President of Greater Cincinnati Watercolor Society. Contact info below under “Class Information”

Showing posts with label pastel. Show all posts

Monday, January 27, 2014

BIRD OF PARADISE - 3

The (maybe) completed painting.  Since this is a learning curve for me, I’m just happy it looks somewhat like the photograph and looks like a bird of paradise and not a rose!


I think I have done well with the blending of the pastel colors.  Here is a close up of part of the flower – you be the judge.


However, the edges are a concern to me, they seem too blurry, but I have to realize that I probably cannot get the same sharp edges that I can achieve in watercolor since I’m using my fingers to blend.  I tried a blending stump but all it did was lift off the color – there must be something I’m doing wrong, so any of you pastelists out there – I’ll gladly take some tips!

Thursday, January 23, 2014

BIRD OF PARADISE - 2

I added color to the background, because I thought it would be easier to lay the final pastels over the background rather than the other way around.


Here I’ve added more to the background and begun adding color to the flower.

Monday, January 20, 2014

PASTEL - BIRD OF PARADISE - 1

I decided to try another pastel painting, something easy, I thought!  But when you are trying to learn something, NOTHING is really easy, is it?

So, anyway, here goes.

I drew the flower from my photograph which was taken either at Krohn Conservatory here in Cincinnati, or at the Stan Hywet Conservatory in Akron, I’m not sure which photo I had printed off.  Then I put my drawing under tracing paper and used a fine Sharpie™ marker to go over the main lines and made a copy of that.  Then, using the method I usually employ with my watercolors, I used Saral to transfer the drawing to my pastel paper (Colourfix paper).  Above is the photo and my drawing.

Thursday, January 31, 2013

STOCK TIP!


After just a few minutes of pastel painting . . . .
 To paraphrase an old 60’s song “Baby Love”
Baby wipes, my baby wipes,
I need you, oh how I need you . . . “

Since I’ve taken up pastels, here’s a little tip for those of you thinking of entering the stock market - invest in any company manufacturing a version of baby wipes!

As shown here – that stock’s gotta soar!

Monday, January 28, 2013

PASTEL PEPPERS - FINISHED

Here the peppers are complete, but not the whole painting yet.

After adding a light background and making the shadows lighter, here is the completed painting.

I’m not thrilled with my background, but for this purpose – education – it’s fine with me!

Thursday, January 24, 2013

PASTEL PEPPERS - Part 4

Here is the yellow pepper in process.

Monday, January 21, 2013

PASTEL PEPPERS - Part 3

Here is the completed orange pepper – slightly refined!

Thursday, January 17, 2013

PASTEL PEPPERS - Part 2

Here you can see how I developed the orange pepper.


Monday, January 14, 2013

PASTEL PEPPERS - Part 1

Another in my little series of fruits and veggies!
\
I decided to use lighter pastels for the drawing, instead of charcoal on this one.

Thursday, January 10, 2013

Monday, January 7, 2013

PASTEL CHILI PEPPERS - Part 3

At this point, I realized that the upper pepper was too short, according to the photo. I’m not that good of a drawer, keep trying though!

I realized I could probably fix that problem easily – and so I did! (Not at all like watercolor!)

Sunday, December 30, 2012

Thursday, December 27, 2012

PASTEL CHILI PEPPERS - Part 1

Hope you all had a wonderful Christmas with your family and friends!


As I continue my venture into pastels, here are some chili peppers.

I began the same way as the onion – drawing in charcoal and finding the darks.

Thursday, December 20, 2012

PASTEL ONION - PART 3

I put in some pale yellows and blues for the background and called in finished.

I think I accomplished an onion – maybe not that specific onion, but an onion nevertheless, so I was content.

Monday, December 17, 2012

PASTEL ONION - PART 2

Then I began drawing onto the pastel paper with charcoal.

Then I found the dark areas of the onion and filled them in with dark brown, then went over that with black.

Then I began layering lighter colors to shape the onion.

Friday, December 14, 2012

PASTEL ONION - PART 1

My friend Rhonda - while holding a bag of onions she had pulled out of my pantry - suggested that I try another pastel painting of - - - an onion! She thought another single veggie would help me along in my pastel venture, and I think she was right.

I had no more pastel paper, however, having used it up in the recent pastel workshop with Cindy Haase.

Of course, that meant I just HAD TO go online to search for some Wallis sanded pastel paper. But, no luck with any of the art suppliers I frequent. So a sale coupon from a local art store necessitated a drive to their store in search of pastel paper. They didn’t have the Wallis paper either (which makes me wonder if something happened in the Pastel World???) but the girl who waited on me sold me some Color Fix sanded paper (which seems somewhat softer to me but that could just be my imagination).

So, finally, photo of onion in hand, I cut and taped my pastel paper and began.

Yikes, this one is on my own – no Cindy to look over my shoulder and make suggestions.

The results follows.

First, I took a photo of an onion with some dark shadows.


Then, per Cindy’s instruction, I printed it off in black and white to show the values better.

Friday, November 9, 2012

PASTEL WORKSHOP

Pastels have always intrigued me. A good friend of mine switched over to pastels several years ago, so I have been able to see what is possible with them. But, I always think they are too messy for me – and they probably are!

However, I attended a pastel workshop last weekend with Cindy Haase a WONDERFUL instructor. I was the only person in class who had never done pastels, and to say I was intimidated is putting it mildly! And then, when Cindy said she doesn’t paint florals, or fabric, or a lot of details (G U L P) I thought about packing up and leaving! But I hung in there and, boy, am I glad I did.

Cindy gave us specific photos to paint from and on day one we painted up to a point, then Cindy would tell us when we were ready for the next step. We painted pears in a chiaroscuro manner, and at the end of the day we put them all up along the wall and Cindy gave us each a critique. Her critiques were to the point, but all began with what she liked about our paintings. I was happy that mine held its place with the others!

Here are some photos of the workshop - Day 1 - The Pear:

Look - a pear!


Cindy's demo.

The pear critique.


At the beginning of day two Cindy went around the group and asked what we had learned on the first day. I could honestly say – Everything! Having never done pastels before it was all new to me, but with her instruction and direction I had been able to produce a good painting. One thing that did amaze me was how easy the pastels were to blend.

Also on day two we began a similar style painting of a tomato – but then Cindy said we were “on our own” after watching her demo.

Yikes!

I began the same way she did, and then began layering my pastels. The only thing that kind of throws me off is the idea of dark to light, just the opposite of our watercolors. I ended the day very happy with my two paintings!

Day 2 - the tomato!  Here are several of the paintings during critique.


While I have no plans to suddenly make pastel my medium of choice, I would certainly feel competent to take them outside and attempt some landscapes!

The beginning of my very first pastel!  I quickly learned not to leave so much white showing.
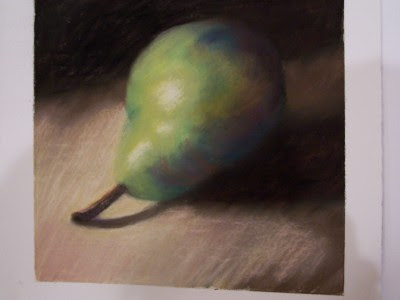
The completed pear.

The beginning of the tomato!

The completed tomato.
Sometimes during the workshop it sounded like I was listening to myself! Cindy told us to:
-  only compare our work to our own work and never compare ourselves to others;
-  incorporate what we learn in a workshop into our own style of painting, not to copy the style of the instructor;
-  keep on working on the painting when we think we have failed – after all, what have we got to lose! – and we will learn from that experience;
-  paint what we love!

For you pastelists out there, I would definitely recommend Cindy’s workshop.

She also works in oils and colored pencil and is the current President of the Colored Pencil Society of America!

A very talented (and kind and good natured) artist!